How to Balance Pistons and Connecting Rods for Your Turbo K24 FRS Build — Down to 0.1g
Jason LiuShare
In this episode of the turbo K24 FRS build, we're finally getting serious. After discovering that the factory rotating assembly components were all over the place in terms of weight, I decided it was time to get precise. We’re talking balancing pistons and connecting rods down to within 0.1 grams — all from the garage.
This guide will walk you through my exact process, the tools you’ll need, and some of the lessons I’ve learned along the way. Whether you're building a high-revving motor or something a bit more streetable, taking the time to balance your internals pays off with smoother performance and better reliability.
If you're more of a visual learner, check out the full balancing tutorial on YouTube.
Note: this article may contain affiliate links. Purchasing from these links provides 2TRACKMIND a small commission.
Why Balancing Matters
Even though parts like pistons and rods often come “matched” from the manufacturer, there can still be small variations — a gram here, a gram there. It might not sound like much, but in a high-performance engine spinning thousands of times per minute, those small imbalances can add up to vibration, wear, and lost performance.
Before you button up your engine for good, this is the time to do it right.
Tools You’ll Need
To get started, I had to pick up a few key tools:
-
Scale (must measure to 0.1g)
-
Spreadsheet (for tracking all your weights)
Optional but helpful:
-
Tabletop vise
-
Belt sander (or ceramic sanding belts for your grinder)
-
Bubble leveler
-
Sharpie for marking passes
Start with the Pistons
We began with JE pistons and Manley H-beam rods. Because we’re boosting, the compression is slightly lower than stock.
The first thing I did was weigh all components individually:
-
Pistons
-
Wrist pins
-
Rings (minimal deviation, but good practice)
I used a spreadsheet to record five measurements of each item and took the average. This step is critical — precision is the name of the game. From the get-go, the pistons were within 0.1g, but the wrist pins had up to a 0.2g spread.
Pro Tip: Mix and Match
Before shaving anything, try combining the lightest piston with the heaviest wrist pin and vice versa. Often, you can even out the total weights without grinding.
Where to Remove Material from Pistons
If you do need to shave weight, here’s where and how:
-
Do NOT touch the piston crown, skirt, or the floor.
-
Only remove material from the inner corners near the wrist pin bosses.
-
Always grind symmetrically — do small amounts, then reweigh.
Aluminum is soft, so I used a die grinder with a bit made for steel (not ideal, but it worked). Clean off every speck of debris with compressed air to avoid false readings.
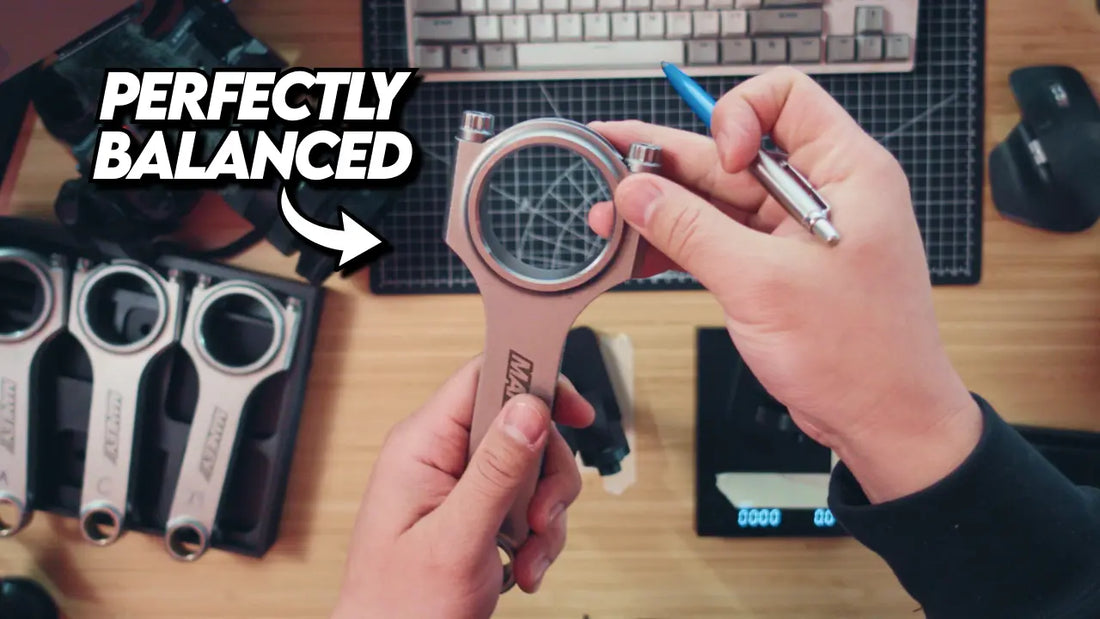
Moving on to the Rods
Balancing the rods is a bit more complicated. Each rod has two masses:
-
Big end (rotating mass)
-
Small end (reciprocating mass)
We also weighed the connecting rod bolts — surprisingly, there was a 0.1g difference just due to oil on the threads. Always clean and reweigh!
Building the Jig
I 3D printed a simple balancing jig and used a level to align both ends evenly. This allowed me to weigh the big and small ends independently with accuracy.
After the first round of measurements, the big ends varied by up to 1.6g — not ideal.
Where to Remove Material from Connecting Rods
For the Big End:
-
Avoid the inner surface and the top ribs (these affect structural integrity).
-
Focus on the outer profile near the bolt holes.
-
Remove material symmetrically in small passes.
-
A band file worked well here and doubles as a tool for other fab jobs.
For the Small End:
-
Remove material from the outer face, not near the wrist pin holes or ribs.
-
Again, keep it balanced and symmetrical.
Once the big ends were all matched, I moved to the small ends by comparing total rod weights. That way, any material removed from the small end helped balance both the small end and the total rod weight.
Don't Forget the Bearings
Lastly, I weighed the connecting rod bearings. While there was some deviation, I was able to match light and heavy halves to make four balanced sets.
Final Results
After a ton of meticulous measuring, grinding, and reweighing, I got every piston and rod balanced to within 0.1g. It’s a tedious process, but if you're going to build a serious engine, it's 100% worth the effort.
Want to Try It Yourself?
All the tools I used are listed above, and if you have any questions, drop a comment. I’ll be happy to help however I can.
If this post helped you out or you just like seeing hands-on engine builds, feel free to subscribe to my channel or share the video on YouTube.
See you in the next one!